
Shopify $300 Facebook Ads Strategy
Best Strategy for a $300 Facebook Ads Budget for E-commerce
Running a successful Facebook ads campaign on a limited budget of $300 can be challenging, but with the right strategy, it’s possible to achieve great results. In this blog, we’ll walk you through a proven, real-world strategy that helped us optimize a low-budget campaign for an e-commerce business, reducing the cost per result from €41 to €17. Follow these steps to target the right audience, optimize your campaigns, and maximize your return on investment (ROI).
Step 1: Research Your Audience Thoroughly
Before launching any campaign, audience research is critical. Identifying the right audience for your e-commerce business sets the foundation for success. Here’s how to do it:
- Understand Your Target Market: Research the demographics, interests, and behaviours of your ideal customers. Use tools like Facebook Audience Insights to gather data on your audience’s preferences.
- Analyze Competitors: Visit the Meta Ads Library to study your competitors’ ads. Examine their content and images, and consider alternative angles to understand what resonates with your shared audience. This will help you craft compelling offers and creative assets tailored to your niche.
By narrowing down your audience to those most likely to engage with your business, you’ll improve your campaign’s efficiency and reduce wasted ad spend.
Step 2: Set Up Your Test Campaign (ABO)
For a $300 budget, we recommend starting with an Ad Set Budget Optimization (ABO) campaign to test different audiences. Here’s how we structured our initial campaign:
- Daily Budget: Allocate €15 per day for the test phase.
- Ad Sets: Create three ad sets, each with a daily budget of €5.
- Content Consistency: Use the exact ad copy, creative, and offer across all three ad sets, targeting different audience segments. This isolates the audience variable, allowing you to identify which group performs best.
In our case, this approach helped us identify two winning audiences within just three days, generating two sales with consistent costs per purchase.
Step 3: Transition to a CBO Campaign
Once you’ve identified your winning audiences, it’s time to scale by creating a Campaign Budget Optimization (CBO) campaign. Here’s how to do it effectively:
- Use Winning Audiences: Take the top-performing audiences from your ABO campaign and combine them into a single CBO campaign.
- Optimize for Efficiency: Analyze the campaign’s breakdown data (age, gender, placement, etc.) to identify patterns and trends. For example:
- Which age group is converting best?
- Are specific placements (e.g., Facebook Feed vs. Instagram Stories) driving better results?
- Does one gender outperform the other?
- Refine Targeting: Adjust your ad sets based on these insights to focus on the most profitable segments.
In our example, after switching to a CBO campaign and optimizing based on breakdown data, we reduced the cost per result from €41 to €17. This significant improvement resulted from allowing Facebook’s algorithm to allocate the budget to the best-performing ad sets.
Step 4: Maintain and Monitor Your CBO Campaign
Once your CBO campaign is live, follow these best practices to sustain performance:
- Avoid Making Abrupt Changes to the Budget: Refrain from making sudden adjustments to the budget, as this can disrupt Facebook’s algorithm and negatively impact performance. Let the campaign run as long as it continues to generate sales.
- Monitor Key Metrics: Regularly check your Cost Per Result (CPR) and other key metrics, such as click-through rate (CTR) and conversion rate, to ensure the campaign remains profitable.
- Optimise Continuously: Continuously refine your audience, placements, and creatives based on performance data to maintain or improve results.
Key Takeaways for a $300 Facebook Ads Campaign
- Start with ABO: Test multiple audiences with a small daily budget (€15/day, split across three ad sets at €5 each).
- Leverage the Meta Ads Library: Utilise competitor insights to craft compelling offers and creative ads.
- Switch to CBO: Once you’ve identified your winning audiences, scale with a CBO campaign and optimize it based on age, gender, and placement data.
- Maintain Stability: Keep the budget steady and monitor performance to sustain results.
By following this strategy, we achieved a significant reduction in cost per result and drove consistent sales for our e-commerce business. With proper audience research and optimization, you can achieve similar results with a $300 budget.
Get More Tips and Updates
Want to learn more about running successful Facebook ad campaigns? Subscribe to our channel for weekly updates, and don’t forget to like and comment with any questions you have. We’re here to help you grow your e-commerce business!
How to Set Up Google Search Console in Shopify
If you want to boost your Shopify store’s search rankings and track its performance on Google, setting up Google Search Console is essential. This free tool helps you monitor how your site appears in search results, fix indexing errors, and optimize for better visibility.
In this guide, we’ll show you the simple steps to verify and connect Google Search Console with your Shopify store. Let’s get started!
What is Search Console?
Google Search Console (GSC) is a free Google service that assists website owners in monitoring, maintaining, and troubleshooting their site’s appearance in Google Search results. Website owners may use GSC to validate that Google can discover and crawl their site, examine Google Search traffic data, and receive notifications when Google finds indexing, spam, or other difficulties on their site, among other things. GSC provides a number of filters and indicators for analyzing website performance and strategizing how to rank higher in Google search.
Google Search Console is an extremely effective tool that assists Shopify merchants in measuring their search traffic and performance, resolving issues, and ensuring that their site is optimized to appear in search results. Search Console is simple to set up on Shopify and is useful since it shows store owners which search phrases their site appears for in Google- Search. Connecting the store to Google Search Console as soon as possible is recommended in order to maximize the store’s visibility in search results.
The following are the steps you must take to integrate Google Search Console with your Shopify website:
Execution
Enabling Google Search Console Tool
1. Navigate to Google Search Console in your browser. Click Here
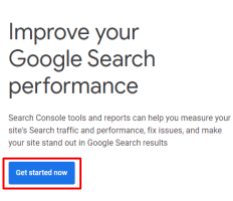
2. Click the Start Now button.
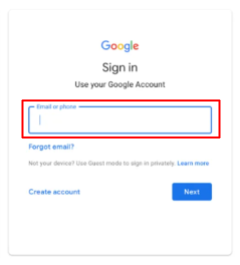
3. Sign in to your Google Account or sign up for a new one.
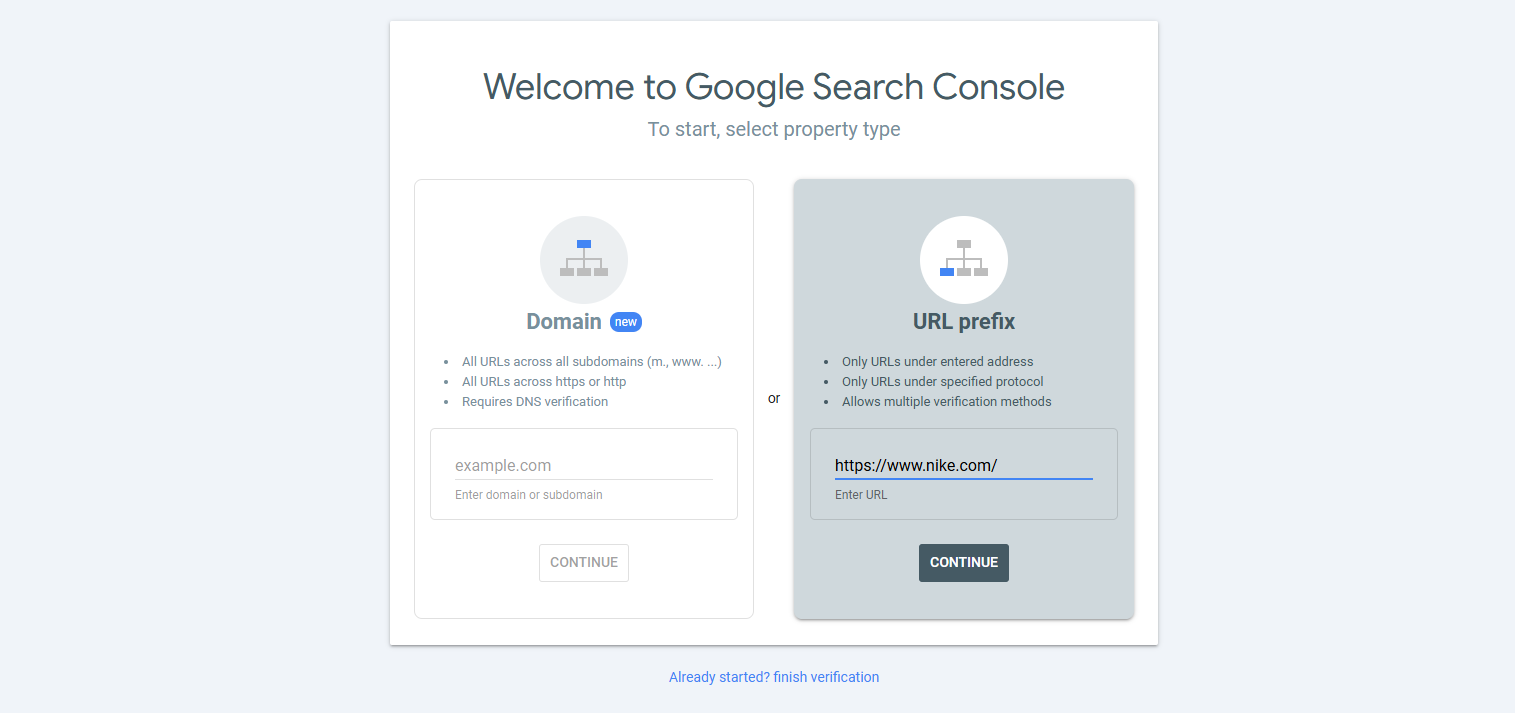
4. Go to the left side of the screen and click on search property. Scroll down and click the Add start now button.

5. Navigate to the URL prefix and type in the URL.
6. Copy the html Tag that we have to paste inside the shopify theme liquid.
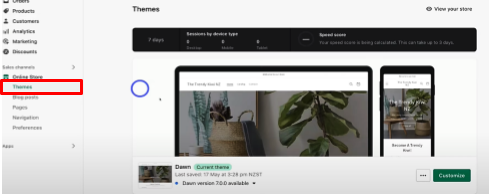
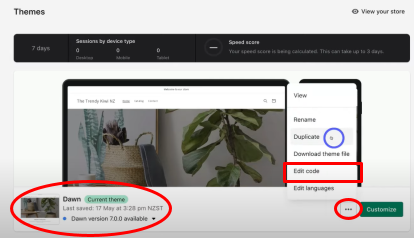
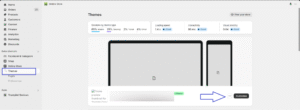
7. Scroll down to Online Store, then Themes.
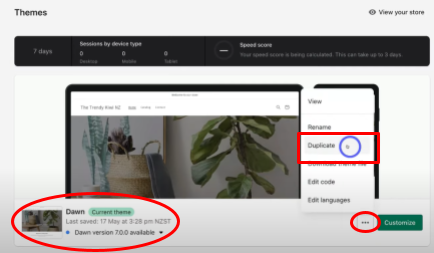
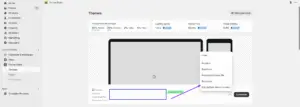
8. Navigate through the three dots beside the Current theme, then click Duplicate.
*This duplicate copy will act as a backup for your theme if something goes wrong with its coding.
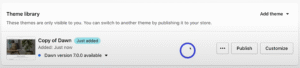
Duplicate copy:
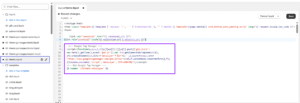
9. Navigate back over to the three dots beside the Current theme, then click Edit Code.
10. Navigate to the left and choose theme. liquid.
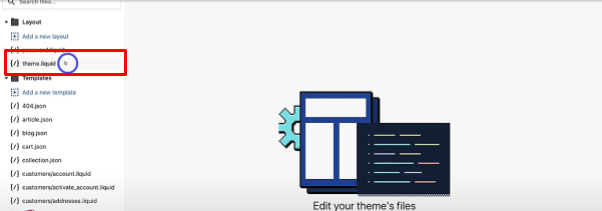
11. Navigate to the left and choose theme.liquid.
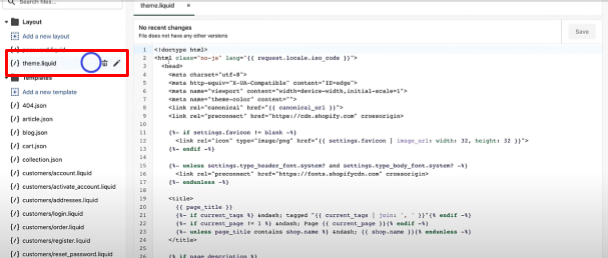
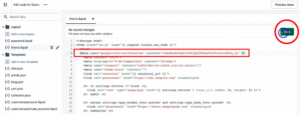
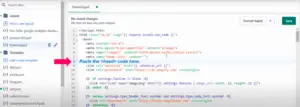
12. Locate the theme.liquid HTML’s head and press enter to add spacing.
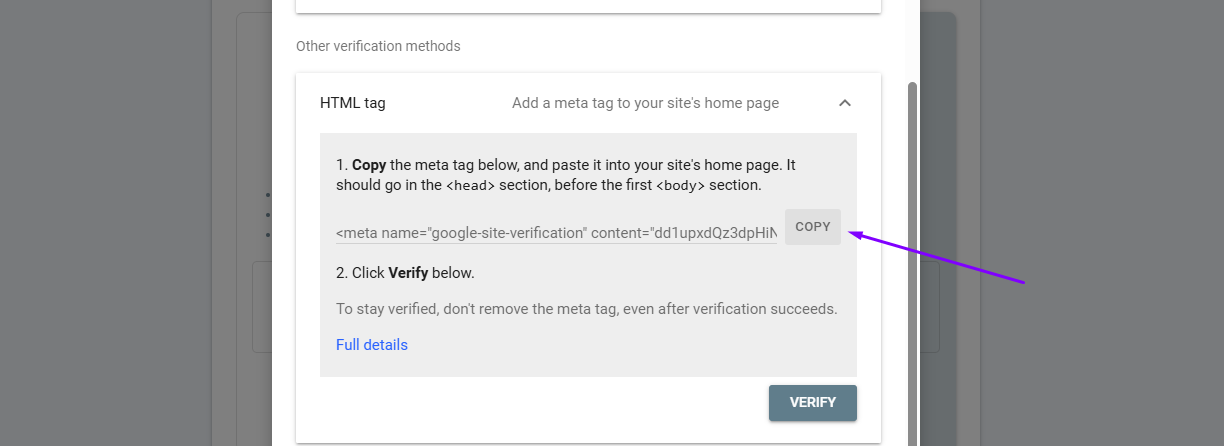
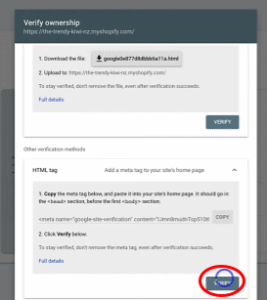
13. Copy the HTML meta tag from Google Search Console (Step 15), paste it into the allotted space, and save it.
14. Your Google Search Console HTML meta tag has been paired with your Shopify theme. Return to Google Search Console by clicking the Exit button.
![]()
15. Scroll down to the HTML tag, then click the drop-down arrow and then the Verify button.
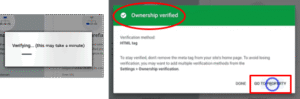
16. This may take a few minutes, but you will notice that the ownership has been confirmed using the HTML tag. Then scroll down and click the go to property button.
17. Congratulations! You have now successfully connected your Google Search Console to your Shopify store. The Google Search Console dashboard is displayed below. This is where you may monitor the performance of your website in Google Search.

How to Install Google Tag Manager on Your Shopify Website
What is Google Tag Manager?
Google Tag Manager (GTM) is a free tag management system that allows you to quickly and easily update website tags (such as analytics and tracking pixels) without having to update your website’s code. It simplifies tag management and makes it easier to track and optimize your online presence. You can manage all of your tags in one place and deploy them quickly and easily with GTM.
One of the most significant advantages of Google Tag Manager is the abundance of available tag templates. The tool comes with templates for over 90 different types of tags. Instead of adding code to the system, simply enter a few variables such as your Google Ads account ID. The rest is handled by the template.
Another benefit of using Google Tag Manager is the ability to set triggers to determine when the tracking code is loaded. Instead of loading every tag on every page, you can load only the ones that are relevant to the page and improve site performance.
More tracking codes or scripts are required for e-commerce platforms such as Shopify. Consider using Google Tag Manager with Shopify if you’re having trouble keeping all of your pixels and scripts straight and up to date.
Google Tag Manager installation in Shopify is a simple and straightforward process. Here are the steps you must follow:
Create a Google Tag Manager and Generate your Tag
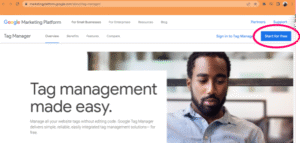
1. Go to Google Marketing Platform.
2. Click “Start for free” and sign in with your Google Account.
3.Choose “Create an Account” from the menu.
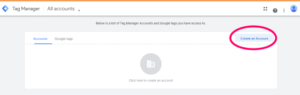
4. You will be taken to the Add New Account page. Fill out the form to create your account.

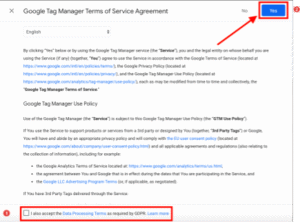
5. After reading and accepting the Google Tag Manager Terms of Service Agreement, click the Yes button.
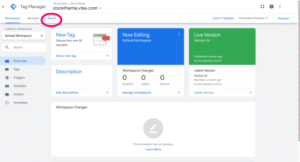
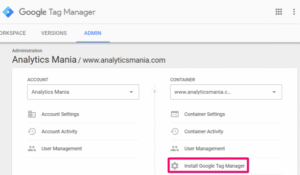
6. Now that you’re in your Google Tag Manager Dashboard Tag Manager, navigate to the “Admin” tab section.
7. Click Install Google Tag Manager.
8. You will be redirected to a page with the code that must be installed on your website.
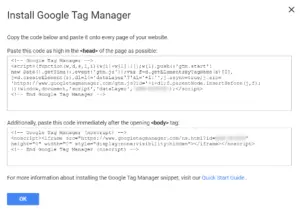
Add Google Tag Manager code to your Shopify Theme
9. Log in to your Shopify account and go to Online Store > Themes.
10. Click Edit Code in the theme drop-down menu.
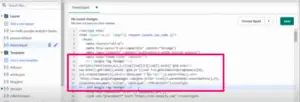
11. Copy the <head> code from Google Tag Manager and look into the head> tags of your theme.liquid.
12. Scroll down and paste the head> code from Google Tag Manager directly beneath the meta tags. Then click Save.
After:
Verify that Google Tag Manager is installed
13. Install the Tag Assistant Chrome extension from Google, then click the Tag Assistant icon on your Chrome browser. You should now be able to view all of your active tags and whether or not they are experiencing any issues.
14. 
15. Congrats! You may now add additional Tags and Tracking Pixels to your site. GTM will make your life simpler!
Brandraz helps you with any type of conversion tracking. Feel free to reach out to use for ecommerce conversion tracking for lead gen conversion tracking.
Run Effective Lead Gen Facebook Ads in 2025
Lead Gen Facebook Ads still dominate in 2025, but with evolving algorithms and user behavior, marketers must adapt their strategies. In this guide, we’ll break down the best practices for running high-converting Facebook lead ads in 2025.
Why Lead Gen Facebook Ads Still Work in 2025
Despite rising competition and changing privacy policies, Facebook continues to be a top lead generation channel because of:
✔ Massive user base (over 3 billion monthly active users)
✔ Advanced targeting options (AI-powered audience insights)
✔ Seamless lead capture (instant forms, chatbots, and CRM integrations)
✔ Cost-effective compared to other paid channels
Why Local Businesses Are Using Facebook for Lead Generation?
Facebook helps local businesses attract nearby customers with precise geo-targeting, affordable ads, and instant lead forms. Features like local awareness ads, Messenger chatbots, and retargeting make it easy to convert engaged users into paying customers—all while building trust in the community.
Step 1: Define Your Lead Generation Goal
Before launching ads, we need to set the goal, where we should send the traffic and or what will be the lead conversion location. For most of the business using below as conversion location.
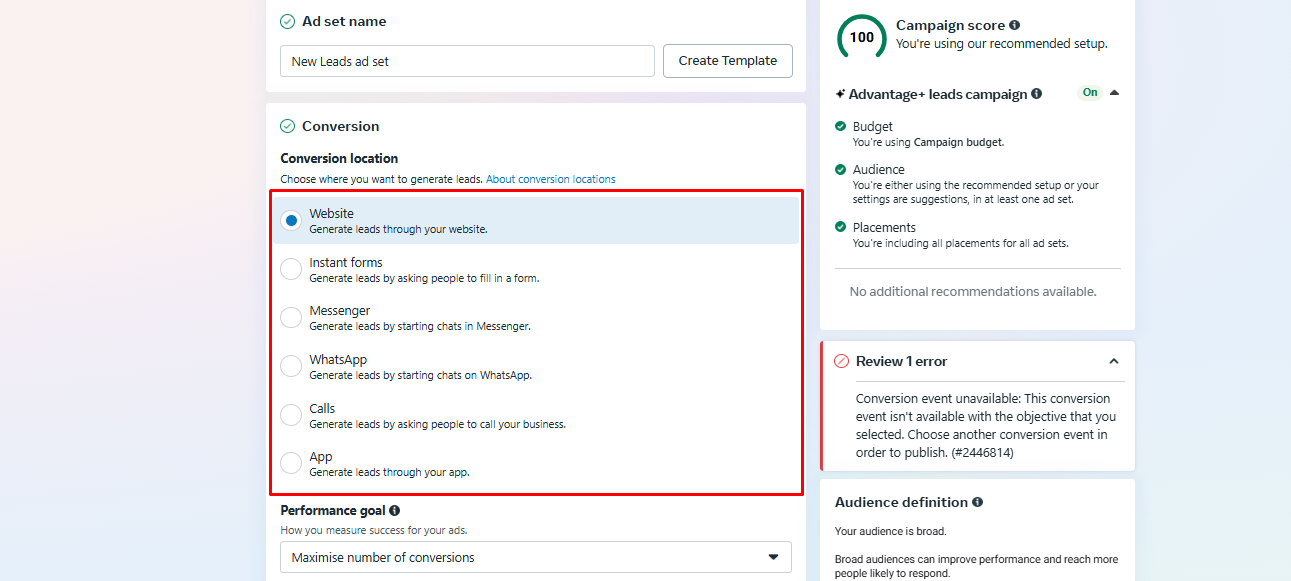
- Website
- Instant forms
- Messenger
- Calls
Step 2: Which Conversion Location is best for Lead Gen Ads.
Getting quality leads is important for any local business.Based on our experience to generate more quality leads from meta ads are
1 – Website –
Send traffic to the website and generate leads via the website. Website leads quality much much higher than other conversion locations.
2 – Messenger–
The Messenger app is the 2nd highest lead generation conversion location. You can also generate the high quality leads by sending the traffic to chat
3 – Instant Form–
Instant form conversion location is good but the problem is instant form generates more unqualified leads.
Step 3: Laser-Target Your Audience
Getting more quality leads mostly depends on the targeting. If you are targeting the right audience it will bring more quality leads for your local business. For example you are providing cleaning services, what will be your targeted audience?
Our Recommendation is to select the specific audience. For example you are providing roofing services, in that case you can target “home improvement” After that click on the demographics and select the relevant upto 5 interest.

Step 4: Craft High-Converting Ad Creatives
In 2025, video and interactive ads will dominate. Best practices:
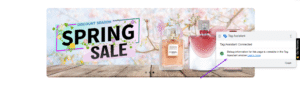
🎥 Short-Form Video Ads (5-15 seconds with captions)
🖼 Static Image Ads (showcase multiple benefits or use cases)
To check what your competitor is doing please visit meta ads library https://www.facebook.com/ads/library

Note – Check your competitor images how they use the CTA based on that you make a few creative
Step 5: Ad Copies
In 2025, meta recommending advantage campaigns which are mostly AI driven. In that case your ads copy should be with keywords which helps meta to get information about your ads and identify who to target.
Step 5: Advanced Tips
When you launch the ads please try to run ABO campaign and follow recommandation
- Create ABO campaign
- Create minimum 4 Ad set
- Allocate same budget for each ad set
- Every ad set must have 2 ads
Keep these ads for 3 days and identify the ROI and winning audience, ads copy.
After that you can scale the ads or create a CBO campaign it depends.
https://www.facebook.com/ads/library
How to Fix Duplicate Canonical Issues in Shopify
Struggling with duplicate canonical URLs on your Shopify store? This quick 5-minute guide will show you how to fix them—without needing a technical SEO expert or waiting for user-selected canonicals.
Why Fix Canonical Issues?
Duplicate canonicals confuse search engines, hurting your SEO rankings. Shopify sometimes generates multiple URLs for the same product or collection, but this simple code snippet will enforce the correct canonical tag dynamically.
Step-by-Step Solution
Step 1: Access Your Shopify Theme Code
- Log in to your Shopify admin backend.
- Navigate to Online Store > Themes.
- Click “Actions” > “Edit code” to open the theme editor.
Step 2: Edit theme.liquid
- In the Code Editor, locate the theme.liquid file (usually under the “Layout” folder).
- Find the <head> section
Step 3: Add the Dynamic Canonical Code
Paste this 2-line code snippet just before the closing </head> tag:
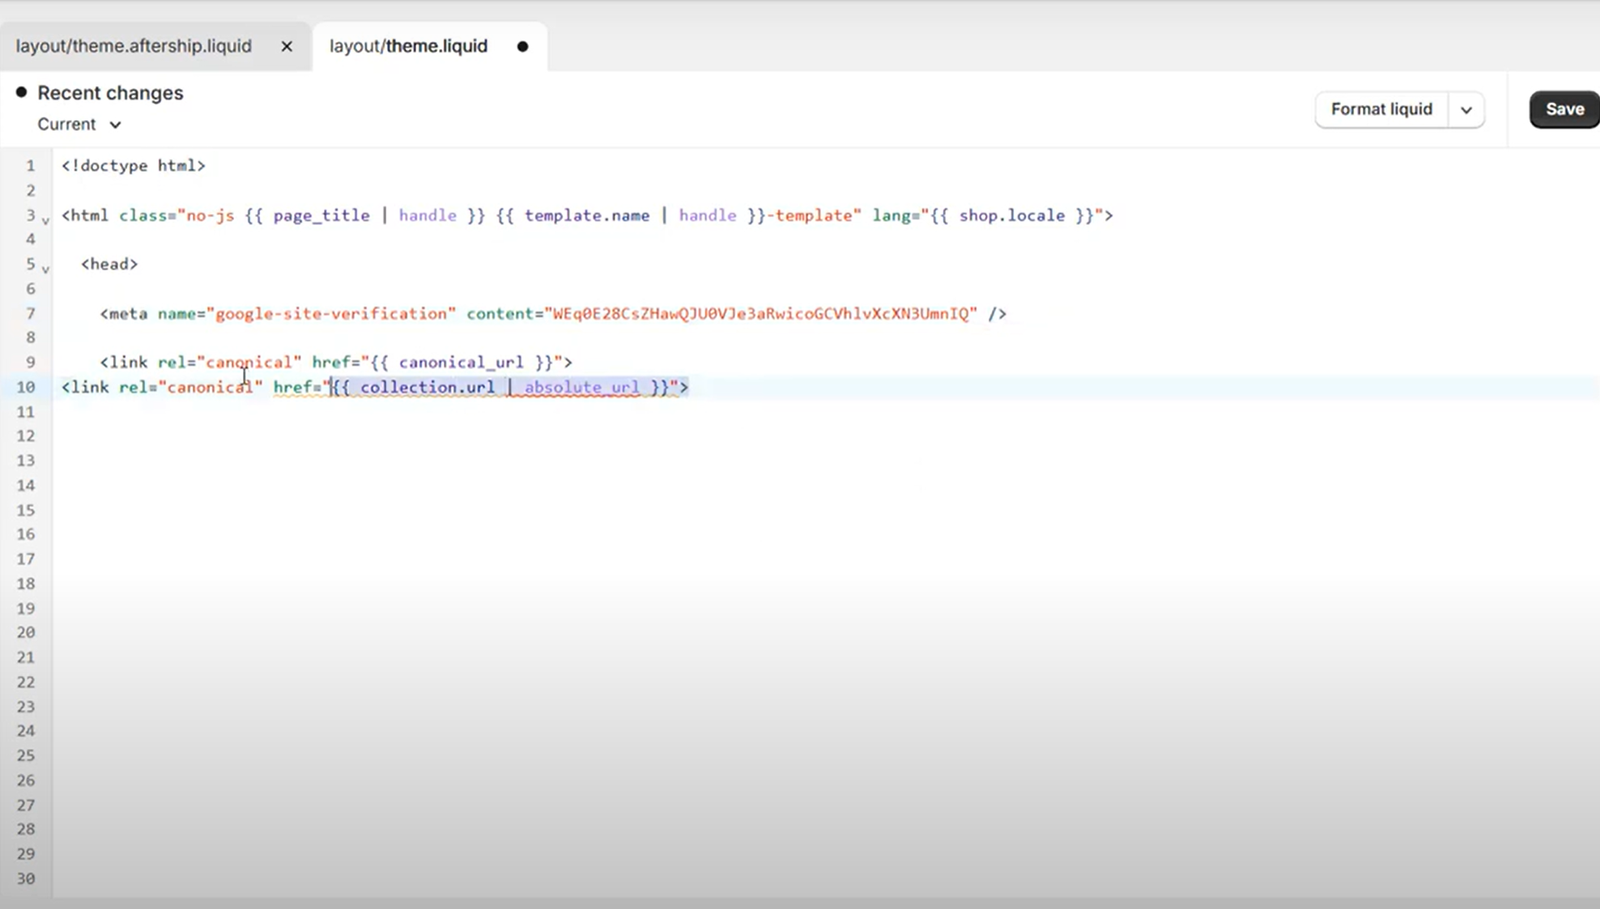
<link rel=”canonical” href=”{{ collection.url | absolute_url }}”>
<link rel=”canonical” href=”{{ product.url | absolute_url }}”>
Step 4: Verify the Fix
- Visit a product/collection page on your live store.
- Right-click > View Page Source and search for “canonical” to confirm the correct URL appears.
Step 5: Validate in Google Search Console
- Go to Google Search Console > “URL Inspection”.
- Enter a previously duplicated URL and click “Validate Fix”.
- Note: It may take a few days for Google to reprocess the pages.
